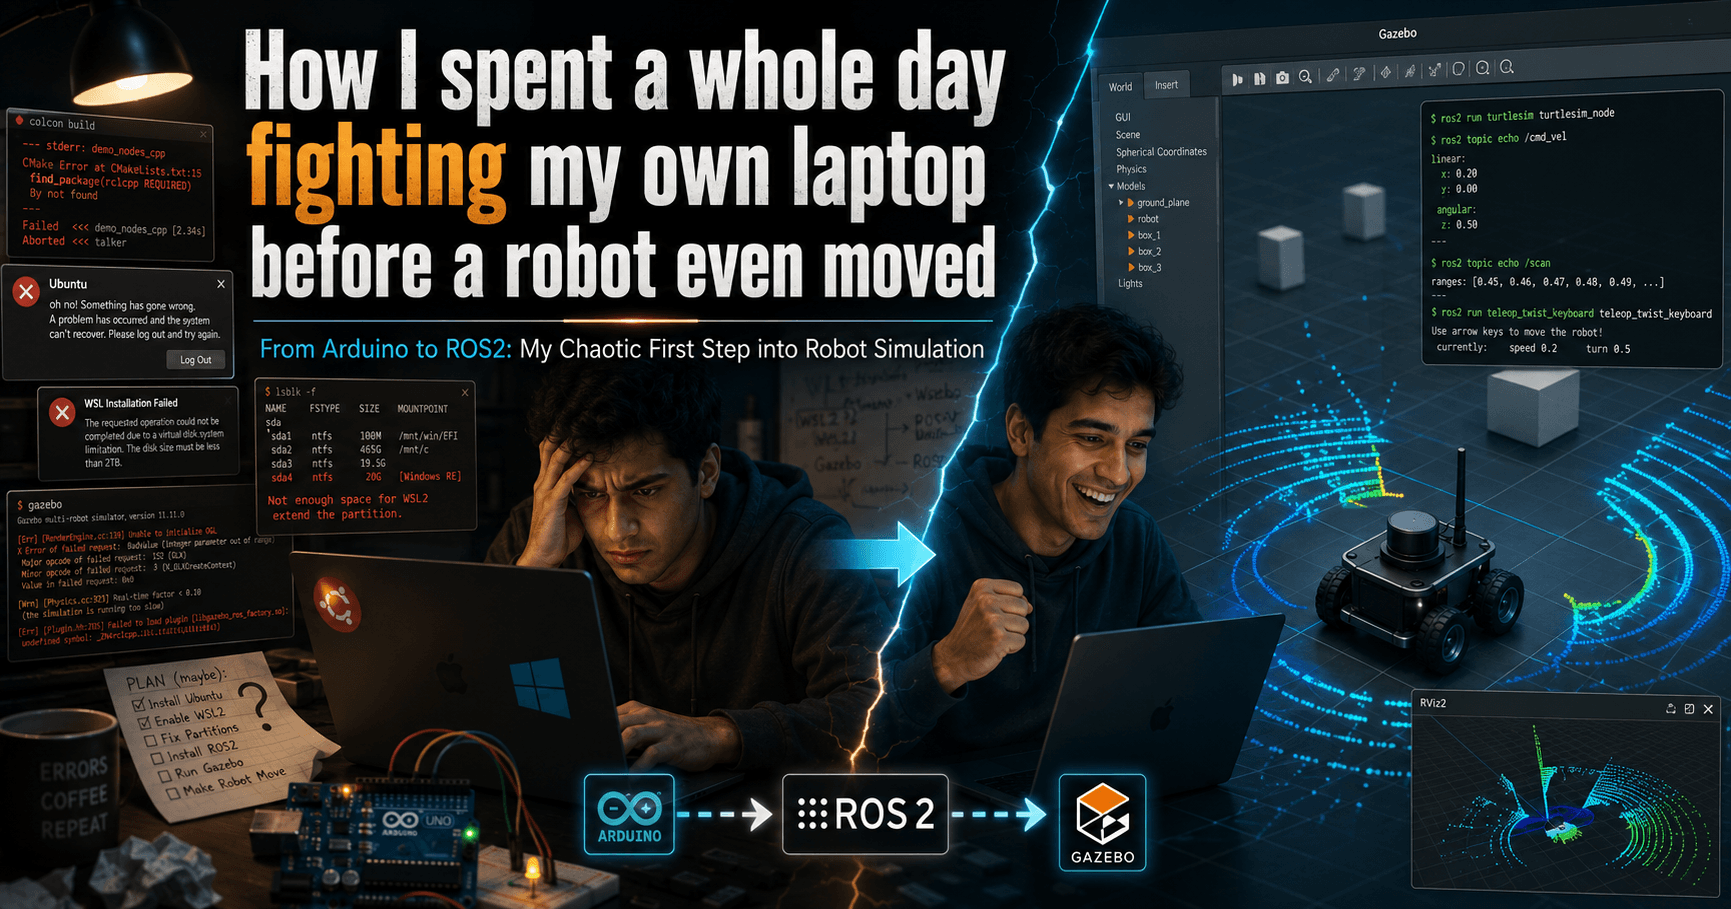
ROS2 Part 2: Custom Nodes, Services, and Finally Making the Robot Move in Circles
Starting with writing my first custom message to staring at a robot that appeared to be falling sideways in RViz2.
In Part 1, I spent an entire day fighting BitLocker, disk partitions, and ghost Gazebo processes before a robot finally moved. The robot moved. I felt accomplished.
Then I realized I had only run other people's code.
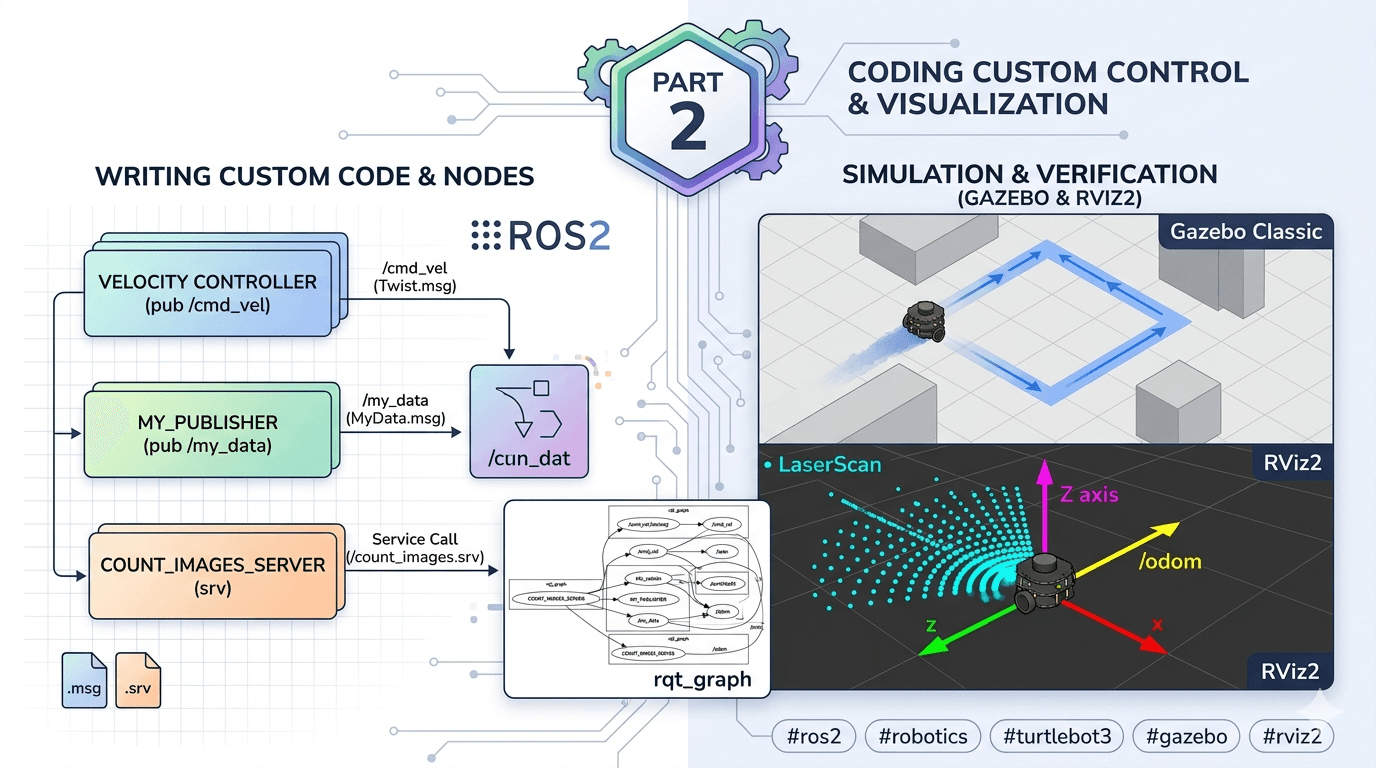
Part 2 is about writing my own. Custom messages, services, parameters, launch files, a velocity controller, and RViz2. Each one had at least one moment where I stared at the terminal wondering what I did wrong.
Let me walk through it exactly as it happened.
First: The Workspace Structure
Before writing any node, the workspace needs to be right. Every ROS2 project follows the same layout:
~/ros2_ws/
├── src/          ← your packages go here. Only here.
├── build/        ← auto-created by colcon. Never touch.
├── install/      ← built packages land here. Source setup.bash from here.
└── log/          ← build logs. Check when colcon fails mysteriously.
The rule I learned the hard way: always run colcon build from ~/ros2_ws/, not from inside src/. And after every single build, source the workspace:
source install/setup.bash
Without this, ros2 run cannot find your executable. Every time. Every terminal. I set this in ~/.bashrc eventually, but for a while I was running nodes and getting "package not found" because I forgot to source.
Custom Messages: Making Nodes Actually Speak to Each Other
Creating the package
cd ~/ros2_ws/src
ros2 pkg create tutorial_pkg --build-type ament_cmake \
  --dependencies rclcpp std_msgs geometry_msgs sensor_msgs
This creates tutorial_pkg with CMakeLists.txt and package.xml inside. The --dependencies flag pre-fills them so you do not have to add everything manually.
Defining a custom message
mkdir -p ~/ros2_ws/src/tutorial_pkg/msg
nano ~/ros2_ws/src/tutorial_pkg/msg/MyData.msg
Inside:
int32 counter
float64 value
string label
This is the message format. Three fields. ROS2 auto-generates a C++ header from this file at build time — you then use tutorial_pkg::msg::MyData in your code. Simple enough.
The CMakeLists.txt additions that matter
For custom messages, you need to tell CMakeLists to generate the interface code. Add this after find_package():
find_package(rosidl_default_generators REQUIRED)

rosidl_generate_interfaces(${PROJECT_NAME}
  "msg/MyData.msg"
)

ament_export_dependencies(rosidl_default_runtime)
And in package.xml:
<build_depend>rosidl_default_generators</build_depend>
<exec_depend>rosidl_default_runtime</exec_depend>
<member_of_group>rosidl_interface_packages</member_of_group>
Build and verify:
cd ~/ros2_ws
colcon build --packages-select tutorial_pkg
source install/setup.bash
ros2 interface show tutorial_pkg/msg/MyData
If your three fields print back — the message exists and is ready to use.
The linking problem I hit
When I registered the publisher and subscriber executables in CMakeLists.txt, I wrote the usual ament_target_dependencies. It compiled. Then it crashed at runtime because the executable could not find the custom message type.
The fix was one extra line I did not know about:
rosidl_get_typesupport_target(cpp_typesupport_target
  ${PROJECT_NAME} "rosidl_typesupport_cpp")

target_link_libraries(my_publisher ${cpp_typesupport_target})
target_link_libraries(my_subscriber ${cpp_typesupport_target})
Any node that uses a custom message type needs to link against the generated code. ament_target_dependencies handles standard packages, but for your own generated interfaces you need target_link_libraries with cpp_typesupport_target.
Once that was in place, both nodes ran correctly. The publisher sent a message every second. The subscriber printed it. I verified with:
ros2 topic echo /my_data
ros2 topic hz /my_data    # confirm it's publishing at 1 Hz
ros2 topic info /my_data  # publisher count: 1, subscriber count: 1
Services: Request, Response, and a Broken .srv File
What a service actually is
A topic is continuous — publishers keep sending whether anyone is listening or not. A service is one request, one response. The client sends something, waits, and the server replies. Think of it like calling a function on another process.
Creating the service definition
mkdir -p ~/ros2_ws/src/tutorial_pkg/srv
nano ~/ros2_ws/src/tutorial_pkg/srv/CountImages.srv
My first attempt looked like this:
---
int32 count
string message
This is wrong. The --- separator divides the request (above) from the response (below). I left the request section completely empty. ROS2 rejected it.
The correct version:
string folder_path
---
int32 count
string message
A service must have something on both sides of ---. After fixing that and adding "srv/CountImages.srv" to the rosidl_generate_interfaces block in CMakeLists.txt, I rebuilt. Still did not work — I kept getting:
Unknown service type: tutorial_pkg/srv/CountImages
The actual fix was a clean rebuild:
cd ~/ros2_ws
rm -rf build install log
colcon build
source install/setup.bash
After a fresh build from zero, the service type appeared:
ros2 interface list | grep CountImages
# tutorial_pkg/srv/CountImages
Then calling it from terminal worked:
ros2 service call /count_images tutorial_pkg/srv/CountImages \
  "{folder_path: '/home/sandip/Pictures'}"
The server replied with the count and a message. Request-response, as designed.
One more thing I was missing initially: ament_package() at the very end of CMakeLists.txt. This is required. Without it the build either fails or produces something broken. It is easy to forget when you are editing a long file in the middle.
Parameters: Configuring Nodes at Runtime
Parameters let you change a node's behaviour without recompiling. The timer_node I wrote reads a period value at startup:
declare_parameter("timer_period_s", 2.0);
double period = get_parameter("timer_period_s").as_double();
The default is 2.0 seconds. You can override it at launch:
ros2 run tutorial_pkg timer_node --ros-args -p timer_period_s:=1.0
When I first tried running this, I got:
Package 'tutorial_pkg' not found
Not because the code was wrong — because I had not sourced the workspace in that terminal. I added both source lines to ~/.bashrc to stop making this mistake:
echo "source /opt/ros/humble/setup.bash" >> ~/.bashrc
echo "source ~/ros2_ws/install/setup.bash" >> ~/.bashrc
source ~/.bashrc
Every new terminal now has both automatically.
Launch Files: Starting Everything at Once
A launch file starts multiple nodes with one command. Instead of opening four terminals and running four things separately, one command handles it all.
# launch/my_launch.py
from launch import LaunchDescription
from launch_ros.actions import Node

def generate_launch_description():
    return LaunchDescription([
        Node(
            package='tutorial_pkg',
            executable='my_publisher',
            name='publisher_node',
            output='screen',
        ),
        Node(
            package='tutorial_pkg',
            executable='my_subscriber',
            name='subscriber_node',
            output='screen',
        ),
        Node(
            package='tutorial_pkg',
            executable='timer_node',
            name='timer_node',
            output='screen',
            parameters=[{'timer_period_s': 1.5}],
        ),
    ])
Add the launch directory to CMakeLists.txt:
install(DIRECTORY launch
  DESTINATION share/${PROJECT_NAME}
)
Build, then:
ros2 launch tutorial_pkg my_launch.py
All three nodes start. Ctrl+C kills all of them at once. No hunting through terminals.
Making the Robot Actually Move
The velocity controller
This node makes TurtleBot3 drive in a square. It alternates between two phases using a simple counter:
// Timer fires every 100ms
if (phase_ == 0) {
    msg.linear.x  = 0.2;   // forward at 0.2 m/s
    msg.angular.z = 0.0;
    if (++step_ >= 20) { phase_ = 1; step_ = 0; }  // 2 seconds forward
} else {
    msg.linear.x  = 0.0;
    msg.angular.z = 0.5;   // turn at 0.5 rad/s
    if (++step_ >= 16) { phase_ = 0; step_ = 0; }  // ~90 degrees
}
publisher_->publish(msg);
Every robot controller at any level of complexity is a variation of this structure: a timer-driven loop that reads state, makes a decision, and publishes a command. Whether it is a simple square driver or a full navigation planner, the pattern is the same.
The node publishes geometry_msgs/Twist messages to /cmd_vel. TurtleBot3's motor driver subscribes to /cmd_vel and translates them into wheel speeds inside Gazebo. I do not touch the physics — I just send velocity commands and the simulation handles the rest.
One issue I hit: I wrote velocity_controller.cpp but forgot to add it to CMakeLists.txt. When I ran ros2 run tutorial_pkg velocity_controller, it did not exist. The fix was adding it properly:
add_executable(velocity_controller src/velocity_controller.cpp)
ament_target_dependencies(velocity_controller rclcpp geometry_msgs)
target_link_libraries(velocity_controller ${cpp_typesupport_target})

install(TARGETS
  my_publisher
  my_subscriber
  velocity_controller
  DESTINATION lib/${PROJECT_NAME}
)
After rebuilding, the robot started driving squares in Gazebo. That was a satisfying moment.
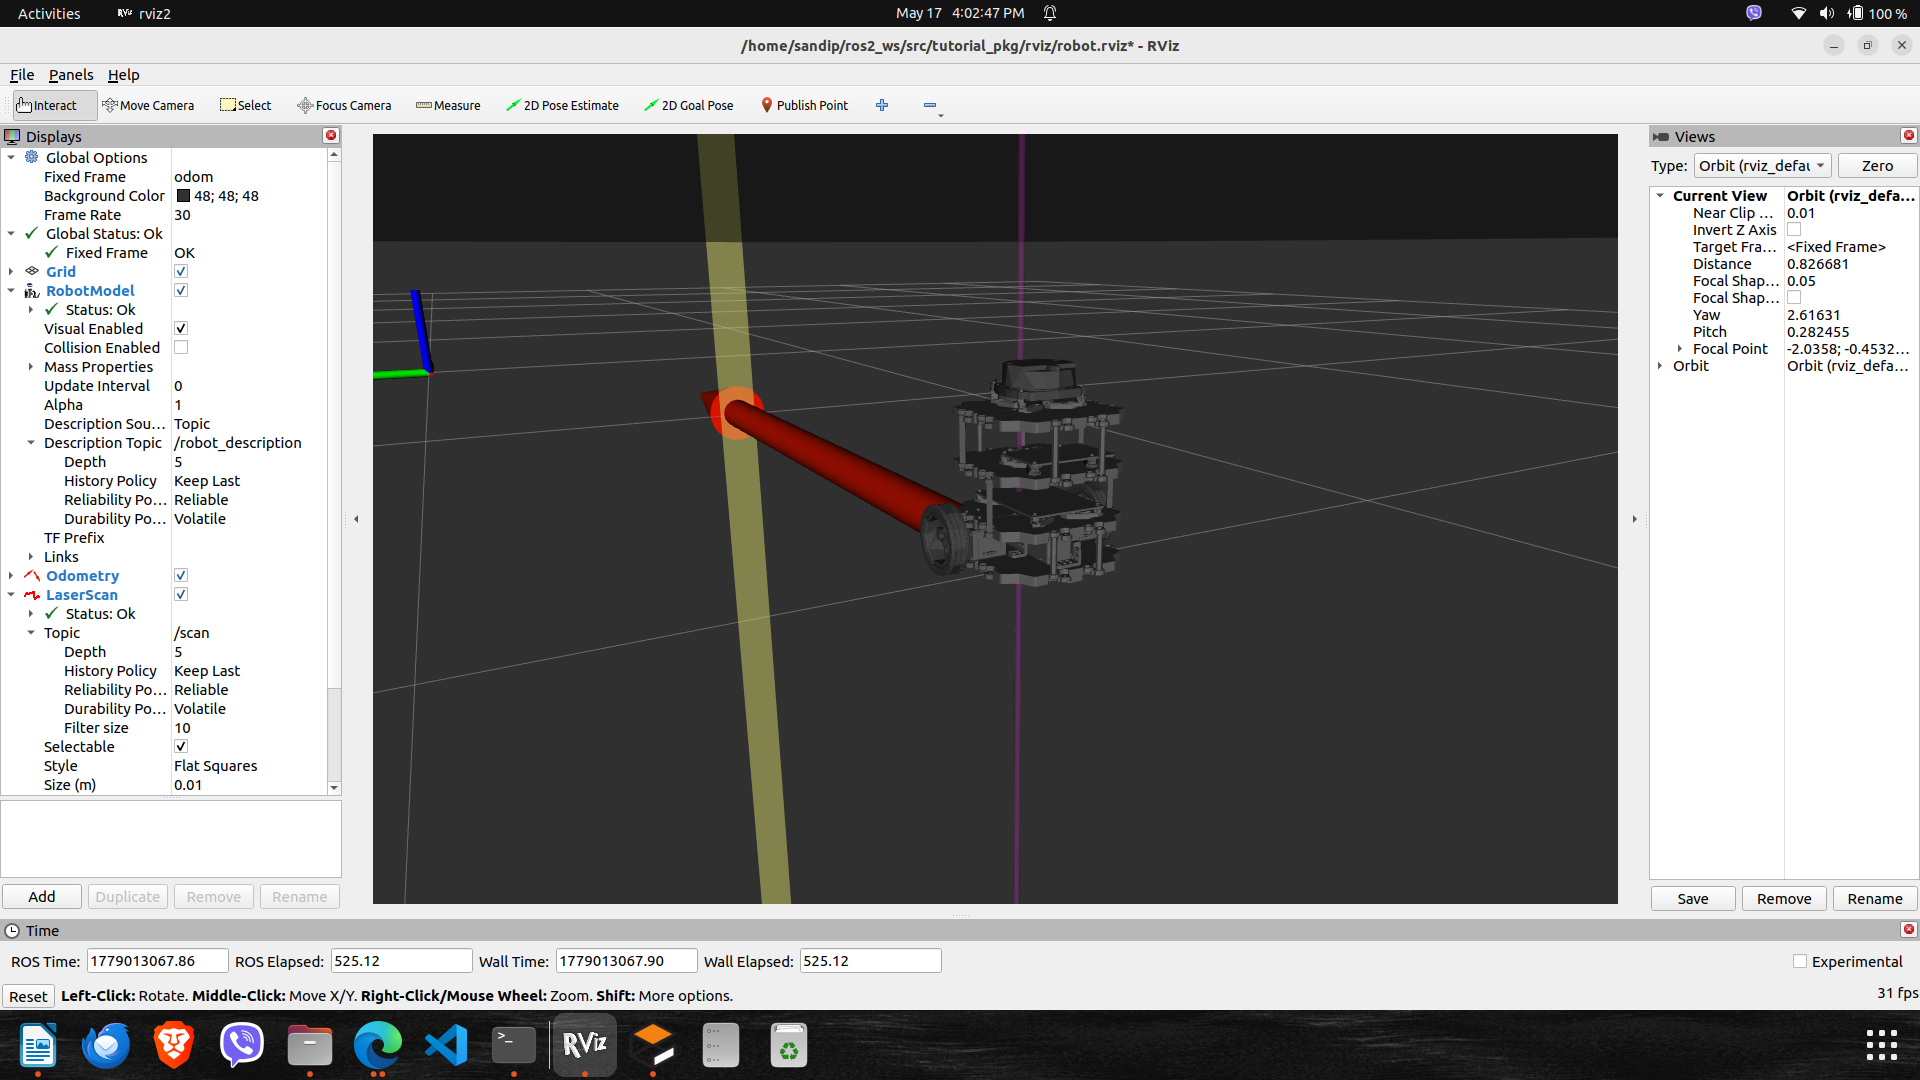
RViz2: The Robot That Appeared to Be Falling
Setting it up
rviz2
RViz2 opens to an empty grey window. You have to configure what to display. The first and most important setting is Fixed Frame. Change it from map to odom. Without this, nothing shows up — RViz cannot place anything without knowing the reference frame.
Then add displays:
Add → RobotModel — shows the 3D robot body. Set Description Topic to
/robot_description.Add → TF — shows all coordinate frame axes.
Add → Odometry → /odom — draws an arrow showing estimated position and heading.
Add → LaserScan → /scan — draws the cyan dots for LiDAR readings.
The hidden Description Topic problem
When I added RobotModel and tried to set Description Topic, the value column in the left panel was too narrow to show anything. It looked like the field was empty but I could not click it. The fix: drag the vertical divider between the property name column and the value column to make the value side wider. Then double-click the value area next to Description Topic and type /robot_description.
The robot appeared to be falling sideways
When I first got the robot model to appear, it looked tilted — like it was leaning at an angle or about to fall. My first thought was a physics problem. It was not.
It was the camera.
In the right panel under Views, my camera had Pitch: 0.41 (about 23 degrees) and Yaw: 1.37 (about 78 degrees). I was looking at the robot from a diagonal overhead angle that made it appear tilted relative to my screen, when it was perfectly upright in the world.
The fix: click the Zero button in the top-right of the Views panel. This resets pitch, yaw, and zoom to a neutral front-facing view. The robot immediately looked correct — a small box standing straight on flat ground.
You can verify whether the robot is genuinely tilted in Gazebo's physics by checking:
ros2 topic echo /odom --once
Look at pose.pose.orientation.w. If it is close to 1.0, the robot is upright. If it is near 0.0, something is actually wrong with the spawn.
Mine was close to 1.0. Camera issue, fully confirmed.
The magenta vertical line
In RViz2 I also saw a magenta vertical line sticking up from the ground. I spent a few minutes wondering what was broken. It is not broken — it is the Z-axis arrow of the odom coordinate frame origin. It means your TF system is publishing, which is good. Once you add the TF display properly, you see all the frame axes and it makes sense.
Verifying the TF tree
To check that all robot links are connected correctly:
ros2 run tf2_tools view_frames
evince frames.pdf
A healthy TurtleBot3 TF tree looks like:
odom → base_footprint → base_link → base_scan
                                  → imu_link
                                  → wheel_left_link
                                  → wheel_right_link
If any link is missing or shown as dashed, that explains why parts of the robot appear wrong in RViz2.
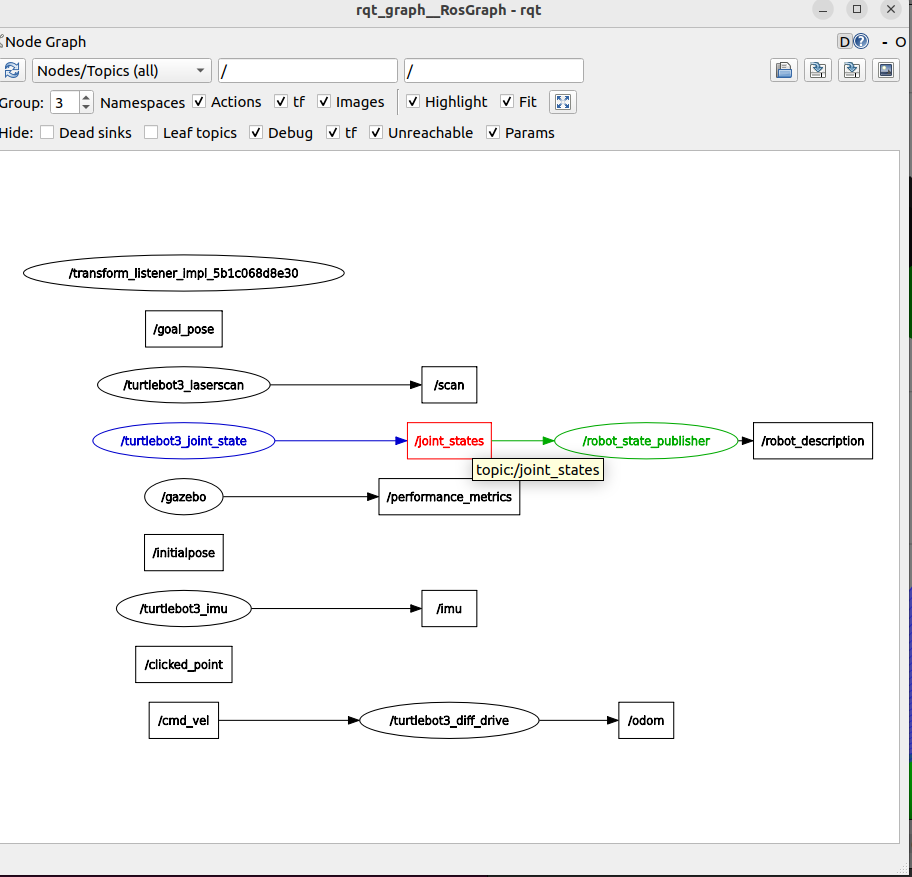
rqt_graph: The Isolated Node Mystery
Running rqt_graph while everything was active showed several nodes floating in isolation — no connections, no topics. I had the velocity controller running and publishing to /cmd_vel, but the graph showed it like it was talking to nobody.
The fix is two checkboxes at the bottom of rqt_graph:
Dead sinks — hides topics that currently have no subscriber. Since I was not running a dedicated subscriber to
/cmd_vel, rqt hid the topic entirely — making the publishing node look orphaned.Leaf topics — hides topics at the outer edge of the graph. My
/scanand/odomhad nothing consuming them downstream (I had not written a subscriber yet), so they were hidden.
Uncheck both. Click the refresh button (circular arrow, top-left). The full graph appeared — velocity controller publishing to /cmd_vel, the motor driver consuming it and publishing /odom, the LiDAR publishing /scan, the joint state publisher feeding into robot state publisher feeding into /tf.
All of it was connected. It just needed the hide filters removed to show it.
What I Learned This Session
The publish-subscribe pattern does not care about who is connected. You can run a publisher with no subscriber, or a subscriber with nothing publishing. The system does not error. It just waits. This is why Subscription count: 0 does not crash anything — the publisher keeps sending whether anyone is listening or not.
CMakeLists.txt has to know about everything. Every new executable needs add_executable, ament_target_dependencies, target_link_libraries, and an install entry. Missing any one of these produces either a build error or a binary that silently cannot find what it needs at runtime.
RViz2 is a visualization tool, not a simulation. It shows you what the data says. If the robot looks wrong in RViz2 but looks correct in Gazebo, the problem is visualization configuration (fixed frame, camera angle, display settings) — not physics. Check Gazebo first before assuming something is broken.
Services vs topics: topics are continuous streams, services are one-shot function calls. Use topics for sensor data and motor commands. Use services for requests that need a specific response — "how many images have you saved?", "reset your counter", "is the robot done with this task?".
The Full Command Reference for This Session
# Build (always from ~/ros2_ws)
colcon build --packages-select tutorial_pkg

# Source (every terminal, or add to ~/.bashrc)
source ~/ros2_ws/install/setup.bash

# Verify custom message built correctly
ros2 interface show tutorial_pkg/msg/MyData

# Call a service manually
ros2 service call /count_images tutorial_pkg/srv/CountImages \
  "{folder_path: '/home/sandip/Pictures'}"

# Change a parameter on running node
ros2 param set /timer_node timer_period_s 0.5

# Start everything with one command
ros2 launch tutorial_pkg my_launch.py

# Watch the robot's position
ros2 topic echo /odom --once

# Check TF tree
ros2 run tf2_tools view_frames && evince frames.pdf

# Open RViz2 with saved config
rviz2 -d ~/ros2_ws/src/tutorial_pkg/rviz/robot.rviz
What Comes Next
The velocity controller drives a fixed square pattern with no awareness of its surroundings. The /scan topic is publishing LiDAR distances every scan cycle and nothing is reading them. The obvious next step is a node that reads /scan, detects when an obstacle is close, and changes the velocity command accordingly.
That is obstacle avoidance — the first step toward a robot that actually responds to the world instead of blindly following a hardcoded pattern.
ROS2 installed, TurtleBot3 running in Gazebo
Custom messages, services, parameters, launch files
Velocity controller — robot drives squares
RViz2 configured with robot model, TF, LiDAR, odometry
→ Subscribe to /scan and read LiDAR distances
→ Publish to /cmd_vel based on what the sensor sees
→ Build obstacle avoidance from scratch
→ SLAM, Nav2, and beyond
Part 2 of the ROS2 from Scratch series. Running ROS2 Humble on Ubuntu 22.04 WSL2, TurtleBot3 Burger in Gazebo Classic.
Tags: #ros2 #robotics #turtlebot3 #gazebo #rviz2 #nodes #services #linux #learning-journey